JAVA培训之生成验证码图片
更新时间:2016年09月21日10时18分 来源:传智播客JAVA培训学院 浏览次数:
生成验证码图片
验证码是Completely Automated Public Turing test to tell Computers and Humans Apart(全自动区分计算机和人类的图灵测试)的缩写,是一种区分用户是计算机还是人的公共全自动程序,可以防止:恶意破解密码、刷票、论坛灌水、有效防止某个黑客对某一特定注册用户,用特定程序暴力破解方式进行不断的登录尝试。实际上验证码是现在很多网站通行的方式,我们利用比较简易的方式实现了这个功能。
下面我们就来学习如何自动生成一个验证码图片,案例的源代码点击此处 进行下载,具体如下:
(1)创建一个web应用,名称为Example1,在该应用下的src目录下新建一个Class类,名称为ImageTest,主要代码如例1-1所示:
例1-1 ImageTest.java
在例1-1中,首先要获得图片缓冲区,即BufferedImage类的一个对象,BufferedImage类的构造方法中,第一个参数和第二个参数表示图片的长和宽,第三个参数是图片的类型;然后获取绘制环境,也可以理解为获取当前图片的画笔,使用该对象可以设置一系列的属性,例如图片的背景颜色、填充形状等。最后使用ImageIO类的write()方法将当前画好的图片写到指定的输出流中。
(2)测试fun1()方法,去F盘查看生成的图片效果如何,如图1-2所示: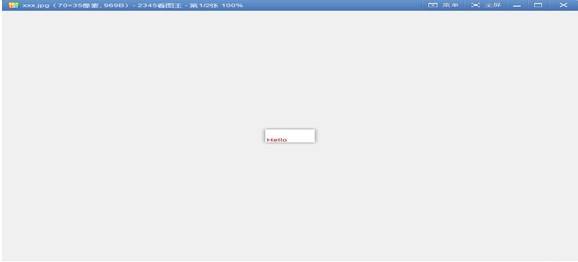 图1-2 绘制的图片
如图1-2所示,绘制的图片背景色是白色,字符串“Hello”的颜色是红色,该字符串的位置也是由我们自己设置的,可以调整。
(1)在ImageTest同包下新建一个Class类,名称为VerifyCode,下面我们对类中的方法进行一一介绍。首先来看该类的成员变量,如例1-2所示:
例1-2 VerifyCode.java类中的成员变量
例1-2中,成员变量w、h分别表示图片的长和宽;成员变量r是Random类型的对象,用来生成随机数;成员变量fontNames是列举验证图片中验证码的字体类型;成员变量codes是列举验证码的所有的可选字符;成员变量bgColor是验证图片的背景色;成员变量text是图片上的验证码。
(2)VerifyCode类的生成随机颜色的方法,主要代码如例1-3所示:
例1-3 randomColor()方法
例1-3中,r是Random类型的对象,r.nextInt(int n)方法返回一个伪随机数,它是取自此随机数生成器序列的、在 0(包括)和指定值n(不包括)之间均匀分布的
(3)VerifyCode类的生成随机字体的方法,主要代码如例1-4所示:
例1-4 randomFont()方法
例1-4中,r.nextInt(fontNames.length)方法是获得一个从0到成员变量fontNames数组的长度之间的整数index,然后将这个整数当作fontNames数组的下标,找到对应的字体类型。局部变量style是随机产生的样式,详情可参考例1-4中的代码注释,局部变量size是随机生成的字体大小,即字号,范围是从24~28;最后将该字体返回。
(4)VerifyCode类的生成随机的干扰线方法,主要代码如例1-5所示:
例1-5 drawLine()方法
例1-5中,局部变量num是记录干扰线的条数,然后创建当前图片的画笔Graphics2D类的对象,再利用r对象生成四个值,其中x1和x2的大小范围在0~70之间,y1和y2的大小在0~35之间,这四个值是用来作为确定一条直线的两个点的坐标,由于有三条干扰线,所以这里使用for循环,然后每循环一次就使用画笔对象g2的drawLine()方法绘制一条线。
(5)VerifyCode类的生成随机字符的方法,主要代码如例1-6所示:
例1-6中,验证码的所有可选字符都在字符串codes中,通过r对象的nextInt()方法获得一个在0到codes.length范围内的整数index,然后调用charAt(index)方法获得指定索引的字符,并返回。
(6)VerifyCode类的创建BufferedImage的方法,主要代码如例1-7所示:
例1-7中,创建BufferedImage对象的步骤与例1-1相同,最后将创建的对象返回。
(7)VerifyCode类的获得验证码图片上的文本方法,主要代码如例1-8所示:
例1-8中的text是成员变量,代表图片上的验证码。该方法要在另一个方法getImage()调用之后调用,getImage()方法后面会详解。
(8)VerifyCode类的将图片保存到指定的输出流,主要代码如例1-9所示:
例1-9中,output()方法有两个参数,第一个参数是绘制的图片,第二个参数是图片将要保存的输出流;使用ImageIO类的write()方法将image对象以JPEG的格式保存在out输出流中。
(9)VerifyCode类的得到验证码图片的方法,主要代码如例1-10所示:
例1-10中,先调用createImage()方法创建图片缓冲区,然后得到绘制环境,即当前图片的画笔;再创建一个用来保存验证码文本的StringBuilder对象,利用for循环及以上提到的方法向图片中画4个字符,然后将sb对象的值赋给成员变量text,这时调用例1-8中的getText()方法就可以获得验证码文本。最后添加干扰线,再返回image对象。
(10)以上就是VerifyCode类的所有方法,现在我们在ImageTest类中定义一个单元测试方法fun2(),该方法的主要内容如例1-11所示:
验证码是Completely Automated Public Turing test to tell Computers and Humans Apart(全自动区分计算机和人类的图灵测试)的缩写,是一种区分用户是计算机还是人的公共全自动程序,可以防止:恶意破解密码、刷票、论坛灌水、有效防止某个黑客对某一特定注册用户,用特定程序暴力破解方式进行不断的登录尝试。实际上验证码是现在很多网站通行的方式,我们利用比较简易的方式实现了这个功能。
下面我们就来学习如何自动生成一个验证码图片,案例的源代码点击此处
 进行下载,具体如下:
1.生成字符验证码
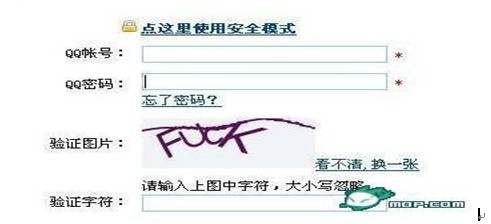
大家想必在登录某个网站的时候都输入过验证码,如图1-1所示:
图1-1 验证码
下面通过一个案例来学习如何自动生成一个验证码图片:(1)创建一个web应用,名称为Example1,在该应用下的src目录下新建一个Class类,名称为ImageTest,主要代码如例1-1所示:
例1-1 ImageTest.java
| public class ImageTest { @Test public void fun1() throws FileNotFoundException, IOException{ /* * 1. 创建图片缓冲区 * 2. 设置其宽高 * 3. 得到这个图片的绘制环境(得到画笔) * 4. 保存起来 */ BufferedImage bi = new BufferedImage(70, 35, BufferedImage.TYPE_INT_RGB); Graphics2D g = (Graphics2D)bi.getGraphics();//得到绘制环境 g.setColor(Color.WHITE);//把环境设置为白色 g.fillRect(0, 0, 70, 35);//填充矩形!填充矩形,从0,0点开始,宽70,高35,即整个图片,即为图片设置背景色 g.setColor(Color.RED);//把环境设置为红色 g.drawString("Hello", 2, 35-2);//向图片上写入字符串,其中2,2表示x,y轴的坐标 ImageIO.write(bi, "JPEG", new FileOutputStream("F:/xxx.jpg")); } } |
(2)测试fun1()方法,去F盘查看生成的图片效果如何,如图1-2所示:

如图1-2所示,绘制的图片背景色是白色,字符串“Hello”的颜色是红色,该字符串的位置也是由我们自己设置的,可以调整。
2.生成字母验证码
通过以上对自动绘制图片的了解,下面我们来完成另外一个绘制图片的类,这个类相较于上面的ImageTest类要复杂很多,如下所示:(1)在ImageTest同包下新建一个Class类,名称为VerifyCode,下面我们对类中的方法进行一一介绍。首先来看该类的成员变量,如例1-2所示:
例1-2 VerifyCode.java类中的成员变量
| public class VerifyCode { private int w = 70; private int h = 35; private Random r = new Random(); // {"宋体", "华文楷体", "黑体", "华文新魏", "华文隶书", "微软雅黑", "楷体_GB2312"} private String[] fontNames = {"宋体", "华文楷体", "黑体", "微软雅黑", "楷体_GB2312"}; // 可选字符 private String codes="23456789abcdefghjkmnopqrstuvwxyzABCDEFGHJKMNPQRSTUV WXYZ"; // 背景色 private Color bgColor = new Color(255, 255, 255); // 验证码上的文本 private String text ; |
(2)VerifyCode类的生成随机颜色的方法,主要代码如例1-3所示:
例1-3 randomColor()方法
| // 生成随机的颜色 private Color randomColor () { int red = r.nextInt(150); int green = r.nextInt(150); int blue = r.nextInt(150); return new Color(red, green, blue); } |
int值。其中局部变量red、green、blue分别代表颜色的RGB的红、绿、蓝三个通道的颜色值。该方法返回的是随机产生的颜色。(3)VerifyCode类的生成随机字体的方法,主要代码如例1-4所示:
例1-4 randomFont()方法
| // 生成随机的字体 private Font randomFont () { int index = r.nextInt(fontNames.length); String fontName = fontNames[index];//生成随机的字体名称 int style = r.nextInt(4);//生成随机的样式, 0(无样式), 1(粗体), 2(斜体), 3(粗体+斜体) int size = r.nextInt(5) + 24; //生成随机字号, 24 ~ 28 return new Font(fontName, style, size); } |
(4)VerifyCode类的生成随机的干扰线方法,主要代码如例1-5所示:
例1-5 drawLine()方法
| // 画干扰线 private void drawLine (BufferedImage image) { int num = 3;//一共画3条 Graphics2D g2 = (Graphics2D)image.getGraphics(); for(int i = 0; i < num; i++) {//生成两个点的坐标,即4个值 int x1 = r.nextInt(w); int y1 = r.nextInt(h); int x2 = r.nextInt(w); int y2 = r.nextInt(h); g2.setStroke(new BasicStroke(1.5F)); g2.setColor(Color.BLUE); //干扰线是蓝色 g2.drawLine(x1, y1, x2, y2);//画线 } } |
(5)VerifyCode类的生成随机字符的方法,主要代码如例1-6所示:
| // 随机生成一个字符 private char randomChar () { int index = r.nextInt(codes.length()); return codes.charAt(index); } |
(6)VerifyCode类的创建BufferedImage的方法,主要代码如例1-7所示:
| // 创建BufferedImage private BufferedImage createImage () { BufferedImage image = new BufferedImage(w, h, BufferedImage.TYPE_INT_RGB); Graphics2D g2 = (Graphics2D)image.getGraphics(); g2.setColor(this.bgColor); g2.fillRect(0, 0, w, h); return image; } |
(7)VerifyCode类的获得验证码图片上的文本方法,主要代码如例1-8所示:
| // 返回验证码图片上的文本 public String getText () { return text; } |
(8)VerifyCode类的将图片保存到指定的输出流,主要代码如例1-9所示:
| // 保存图片到指定的输出流 public static void output (BufferedImage image, OutputStream out) throws IOException { ImageIO.write(image, "JPEG", out); } |
(9)VerifyCode类的得到验证码图片的方法,主要代码如例1-10所示:
| // 调用这个方法得到验证码 public BufferedImage getImage () { BufferedImage image = createImage();//创建图片缓冲区 Graphics2D g2 = (Graphics2D)image.getGraphics();//得到绘制环境 StringBuilder sb = new StringBuilder();//用来装载生成的验证码文本 // 向图片中画4个字符 for(int i = 0; i < 4; i++) {//循环四次,每次生成一个字符 String s = randomChar() + "";//随机生成一个字母 sb.append(s); //把字母添加到sb中 float x = i * 1.0F * w / 4; //设置当前字符的x轴坐标 g2.setFont(randomFont()); //设置随机字体 g2.setColor(randomColor()); //设置随机颜色 g2.drawString(s, x, h-5); //画图 } this.text = sb.toString(); //把生成的字符串赋给了this.text drawLine(image); //添加干扰线 return image; } |
(10)以上就是VerifyCode类的所有方法,现在我们在ImageTest类中定义一个单元测试方法fun2(),该方法的主要内容如例1-11所示:
| @Test public void fun2() throws FileNotFoundException, IOException{ VerifyCode vc = new VerifyCode();//创建VerifyCode类的对象 BufferedImage bi = vc.getImage();//调用getImge()方法获得一个BufferedImage对象 VerifyCode.output(bi, new FileOutputStream("F:/验证码.jpg"));//调用静态方法output()方法将图片保存在文件输出流中 System.out.println(vc.getText());//在控制台上打印验证码的文本值 } |
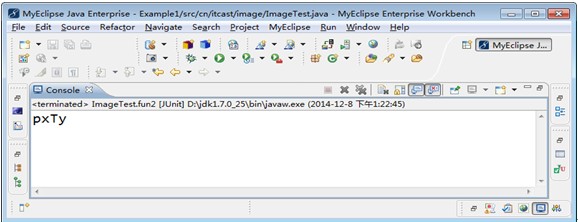
(11)执行fun2()方法,控制台上打印结果如图1-3所示:
图1-3 验证码信息
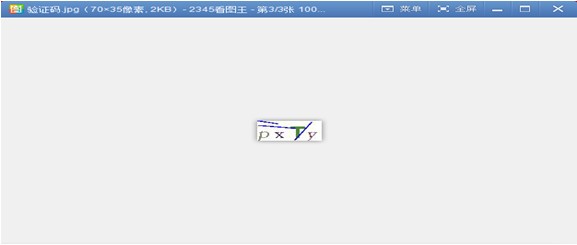
(12)由图1-3可知,验证码文本信息为“pxTy”,现在去F盘中找到验证码.jpg,打开如图1-4所示:
图1-4 验证码
在以后的开发中,想获得验证码就可以把VerifyCode类当作一个帮助类,将它拷贝到自己的项目中然后调用相应的方法就可以获得验证码图片。
本文版权归传智播客Java培训学院所有,欢迎转载,转载请注明作者出处。谢谢!
作者:传智播客Java培训学院
首发:http://www.itcast.cn/javaee


 JavaEE
 鸿蒙应用开发
 HTML&JS+前端
 Python+大数据开发
 人工智能开发
 跨境电商
跨境电商 电商视觉设计
 软件测试
软件测试 新媒体+短视频
 集成电路应用开发
 C/C++
C/C++ 狂野架构师
狂野架构师 IP短视频
IP短视频


